When Jennifer Lauren Handmade was looking for pattern reviewers I jumped onto the email list to sign up! I love the classic look of some of her designs and I was IN LOVE with the initial photos of the Mayberry Dress that she sent out. I mean…those off-center buttons…right?! So cute and unique! What I also liked about this pattern was that it could be adapted for different bust sizes. I love that this sewing trend is breaking into the patterns and this was my first time using an adaptive bust pattern. Also, this dress comes with three different sleeve options. This allows the dress to be designed for different seasons. I think that it would sew up well in a long-sleeved, cosy flannel for winter or flowy, cotton lawn short-sleeved for summer. In fact…I’m already envisioning my own flannel version… 🙂
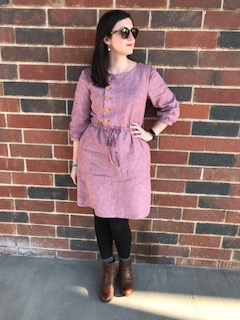
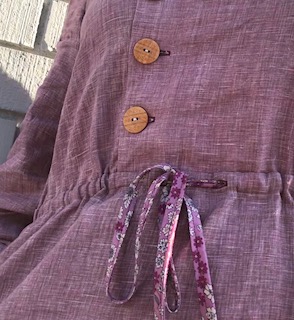 I decided to bust into my stash and use a linen that I purchased from Mood Fabrics a couple of years ago while I was visiting New York City. I love the easy look of linen dresses and I felt like using a simple fabric allowed for adding fun details. The Mayberry has two chances to accessorize the dress: buttons and the drawstring. I used wooden buttons purchased from my local yarn shop, The Lamb Shop and a pre-made bias tape purchased from Fancy Tiger Crafts. I appreciate that these allow the sewist to add personal touches to the pattern.
I printed off the pattern in PDF form and it taped together well. Jennifer made the instructions simple for what pages you need to print depending on your size, bust size, and sleeve option. Just read all of them before you begin!! I initially saw all the pages and didn’t understand why I needed all of them only to find out that I didn’t need about half of them! If you haven’t printed off a pattern meant for A4 paper before, they do tape together a bit differently than you might be used to. Do not be alarmed! It will make sense once you start, but the first time I did it I definitely thought that I was doing it wrong! I think it would be more helpful if there were notches or shapes to match up on the pattern, though, for matching each page. After it was all taped together, I cut a straight size 12 after checking the finished measurements for the hips.


I started sewing the dress according to the directions and was initially confused because some of the photos are drawn in a way that would portray the garment as the opposite of what you see while sewing, but it would be what the dress would look like on you. Once I realized that, the drawings made more sense. What I appreciated about Jennifer’s instructions were her tips! I felt like the pattern was geared towards beginning level sewists who wanted to conquer buttonholes or dresses with fun elements. The hints were reminders or tips to keep in mind while sewing. The directions did not include finishing the side seams of the skirt portion, so I would add that in, but finishing seams was included in all other sewing instructions, which is another reason that this pattern would be great for the beginner sewist looking for easy intermediate projects!
As far as the construction of the dress went, the only thing that I found difficult to sew were the sleeves. I felt like one side of them matched and gathered better than the other side and the ease was a bit tricky to fit. My sleeves do not look beautiful, but I am not the biggest sewing perfectionist! The most interesting part to sew was the waistband. I loved the way that Jennifer did it because the seam allowance between the bodice and the skirt served as the waistband section. Jennifer allotted a larger seam allowance (1 inch) for connecting the bodice and the skirt. Then, you trim only one half of the seam allowance, flip up the other inch of seam allowance, and topstitch that down to serve as the channel for the drawstring. I loved the way that Jennifer did this because it allowed for the seamless drawstring integration into the project! I choose the pre-made bias binding because of the fun print and to be honest…I really don’t like making bias tape!
In terms of the overall fit, I love this dress!! I wore it today to the movies, dinner, and drinks and I felt amazing the whole time in it! The only thing that I would change, and it may just be my personal preference, is the width of the sleeve. The sleeve width is about an inch or two too wide for me. I prefer a more slim sleeve and actually tend to make this pattern adjustment in most ¾ dresses I sew. If you wanted to adjust the width of this sleeve, you would just have to do so before sewing on the sleeve cuff.


Overall, this is such a fun pattern for beginner/intermediate sewists who are looking to add a drawstring or buttonholes to their next pattern! I loved making this pattern and I’m sure that you will also 🙂
